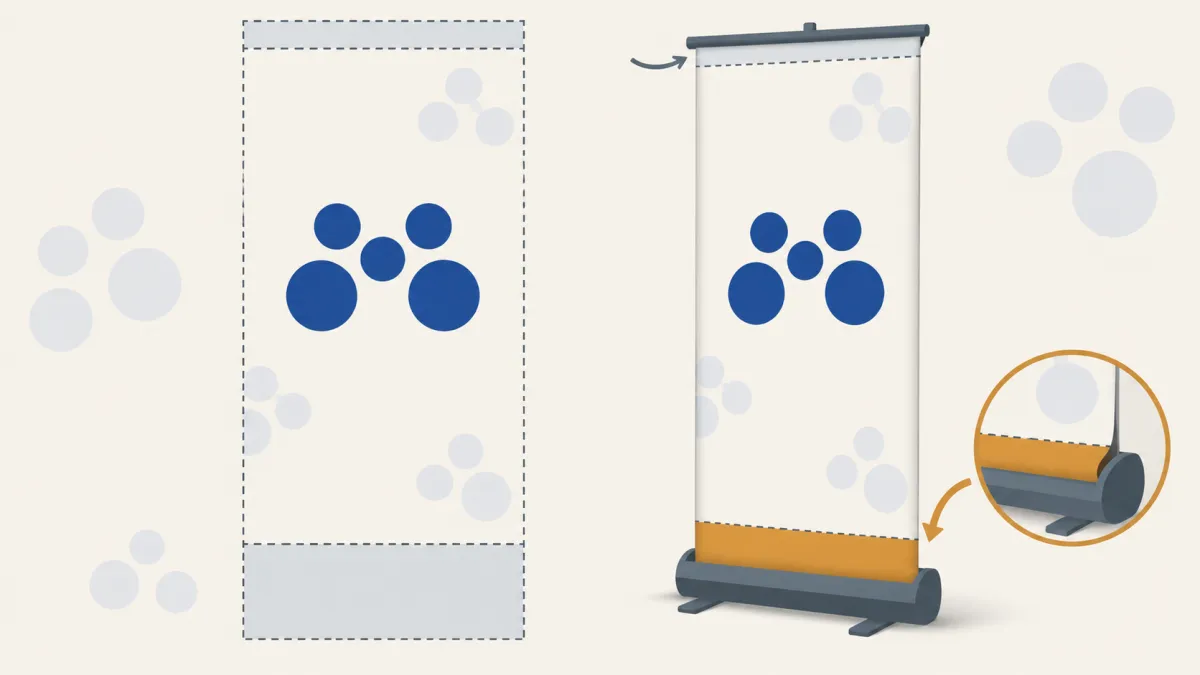
Pull-up banner artwork fails in one very specific way: the designer builds a beautiful 850 x 2000mm graphic, it prints perfectly, and the client's logo disappears into the base. Not a print fault, not a hardware fault, just 90mm of artwork feeding into the mechanism exactly as designed, with the logo sitting in it.
This guide is the complete file setup for our Standard and Premium 850mm pull-ups, from our artwork guidelines, so that never happens to a job you send us.
The one thing to understand first
The stand hides part of the print. On both our models:
- 10mm at the top is hidden in the top rail.
- 90mm at the bottom feeds into the base.
So the print must be 100mm taller than the visible graphic, and your file is built to the full print size, not the visible size:
| File size (trim box) | Visible graphic | |
|---|---|---|
| Standard 850mm | 850 x 2100mm | 850 x 2000mm |
| Premium 850mm | 850 x 2200mm | 850 x 2100mm |
Set your document to the file size in the left column. That is the number everything else hangs off.
The safe zone
Because hardware sits right at the edges, keep all important text, logos and images inside the safe zone:
- 50mm from the top edge
- 50mm from the left and right edges
- 150mm from the bottom edge
That leaves an internal safe area of 750 x 1900mm on Standard and 750 x 2000mm on Premium. Background colour and imagery can and should run to the full trim box, but anything the viewer must read lives inside those margins. The bottom 150mm is the one designers underestimate: 90mm of it is physically inside the base, and the rest is the zone where the graphic curves into the mechanism and the eye stops reading anyway.
The file requirements
- PDF only. No JPEG, PNG, AI or PSD.
- 100% scale. Build the file at actual size. Do not scale down or supply reduced proportions.
- Trim box at the file size for your model: 850 x 2100mm Standard, 850 x 2200mm Premium.
- Fonts converted to outlines, so nothing is missing or substituted at output.
- CMYK colour mode. Files supplied in RGB are auto-converted, which can shift colours, so convert them yourself and check.
- Pantone matching (optional): for the closest reproduction of a specific colour, use Pantone C spot colours and our RIP profile converts them for best match.
- Flatten gradients, transparency and masks before export. Live transparency is the classic source of unexpected results in complex artwork.
- 300dpi raster images at 100% size.
The 2000mm file trap
This one gets its own section because it is the most common pull-up artwork error we see.
If a Standard file is supplied at exactly 850 x 2000mm (or a Premium file at 850 x 2100mm), the file is the visible size, not the print size. We will automatically add the missing 100mm of bleed, 10mm at the top and 90mm at the bottom, so the job can print. But that added area is generated, not designed, and it may not appear correctly in the finished banner. If your background is a photo or a gradient, the extension can be visible; if content sits near the bottom, the base swallows it.
The fix is simply to build at the correct file size from the start and design the bottom 90mm as part of the artwork. Never rely on the automatic extension for anything that matters.
Designing for how a pull-up is actually seen
Beyond the technical setup, a few design realities that improve pull-ups every time:
- The top third does the work. A pull-up is read from eye level and above by someone standing a few metres away. Put the hook, the logo or the headline in the top third, the supporting message in the middle, and keep the bottom section for colour, texture or contact details rather than anything critical.
- Design the base zone deliberately. The bottom 150mm is best treated as background: a colour field, a pattern, a gradient that can safely disappear into the base. Do not leave it white by accident, because a white strip curving into a black base looks unfinished.
- Bold beats busy. Like any banner, contrast and size carry further than detail. Fine type at pull-up height is unreadable from across a room.
- Photos need a panel. If type sits over photography, panel it on a solid block so it stays legible against whatever the image is doing.
Supplying multiple designs
You can supply several artworks in one job. Each design must be:
- Saved as its own separate PDF, and
- Named with its quantity using the format [Artwork Name]-qty-[Quantity].pdf, for example
Promo-Banner-qty-3.pdf. Including the final flat size in the name helps too.
That naming is how quantities get matched to designs without a back-and-forth.
Why the artwork setup matters for the warranty
Worth knowing: print issues caused by supplied artwork are not covered by our pull-up warranty. That includes low-resolution files, missing bleed and poor file setup. In practice, a file built to the correct size, with the safe zone respected and the bottom zone designed, is what produces a banner with no artwork-related issues in the first place. Our pull-up banner guide covers the models, the warranty and the honest boundaries on where a pull-up belongs.
Pre-send checklist
- PDF only, built at 100% scale
- Trim box 850 x 2100mm (Standard) or 850 x 2200mm (Premium), never the visible size
- Critical content inside the safe zone: 50mm top and sides, 150mm bottom
- Bottom 150mm designed as background, not left white or holding content
- Fonts outlined, document in CMYK, Pantone C spots for critical colours
- Gradients, transparency and masks flattened
- Raster images at 300dpi at 100%
- Multiple designs as separate PDFs named [Name]-qty-[Quantity].pdf
Frequently Asked Questions
What size should a pull-up banner file be? 100mm taller than the visible graphic: 850 x 2100mm for our Standard 850mm pull-up (visible 850 x 2000mm) and 850 x 2200mm for the Premium (visible 850 x 2100mm). The extra 100mm is 10mm hidden in the top rail and 90mm feeding into the base.
Where is the safe zone on a pull-up banner? Keep important text, logos and images at least 50mm from the top and side edges and 150mm from the bottom edge. That gives a safe area of 750 x 1900mm on Standard and 750 x 2000mm on Premium.
What happens if I supply the file at 850 x 2000mm? We automatically add the missing 100mm of bleed so it can print, but that extension is generated rather than designed and may not appear correctly on the finished banner. Build at the full file size instead and design the bottom zone deliberately.
Why should the bottom of a pull-up be background only? Because 90mm of it feeds into the base and the rest curves into the mechanism, so nothing placed there reads. Treat the bottom 150mm as a colour field, pattern or gradient that can safely disappear, and never leave it white by accident.
What file format do you accept for pull-up banners? PDF only, at 100% scale, with fonts outlined, CMYK colour, and gradients, transparency and masks flattened before export. Raster images should be 300dpi at actual size.
Can I send several designs in one order? Yes. Save each design as a separate PDF and name it with its quantity in the format [Artwork Name]-qty-[Quantity].pdf, so quantities match designs without a follow-up.
Key takeaways
- The stand hides 100mm: 10mm in the top rail, 90mm in the base. Build files 100mm taller than the visible graphic.
- Standard file 850 x 2100mm, Premium 850 x 2200mm. Never supply the visible size.
- Safe zone: 50mm top and sides, 150mm bottom. Design the bottom 150mm as background.
- PDF only, 100% scale, fonts outlined, CMYK, transparency flattened, 300dpi images.
- Put the hook in the top third; pull-ups are read from eye level at a few metres.
- Name multiple designs [Name]-qty-[Quantity].pdf as separate PDFs.
Send print-ready pull-up artwork
Build to the right file size, respect the safe zone, and the banner arrives with every logo exactly where you put it. Mediapoint supplies trade-only, blind-shipped pull-up banners in Standard and Premium 850mm models. Send your PDF through for a quote and tell us the model, and we will take it from there.