Eyelets, Holes and Mounting Hardware for Corflute Signs: A Practical Guide
Mounting is the part of corflute signage that gets the least attention and causes the most problems. The substrate could be perfect, the artwork could be flawless, the printing could be impeccable, and the sign still fails because someone used the wrong eyelet placement, drilled holes too close to the edge, or specified a Thru-cut shape with sharp internal corners. Mounting decisions made at the artwork stage cost nothing to get right and cost real money to get wrong.
This guide consolidates Mediapoint's mounting specifications and the practical mounting decisions that determine whether your sign survives in the field. It's for installers, sign shop resellers, DIY-deploying customers, and anyone specifying corflute artwork who needs to think about how the sign will actually be mounted before the file gets exported. The aim is one reference point for the mounting questions that come up across the corflute category.
For the comprehensive overview of corflute signage in Australia, see the complete guide to corflute signs in Australia. This article is the focused companion piece on mounting hardware.
Important: this article is general guidance based on Mediapoint's product specifications and general installer experience. Mounting outcomes depend on installation quality, site conditions, weather, hardware quality and other variables outside Mediapoint's control as the printer. Specific guidance on wind speed thresholds, edge clearances and material durability is provided as planning reference, not warranty. For high-stakes installations where mounting failure has significant consequences (public safety, expensive damage to nearby property), consult a qualified sign installer about site-specific requirements. Mediapoint prints what is supplied; the customer or installer is responsible for installation decisions and outcomes.
Hole cutting on corflute
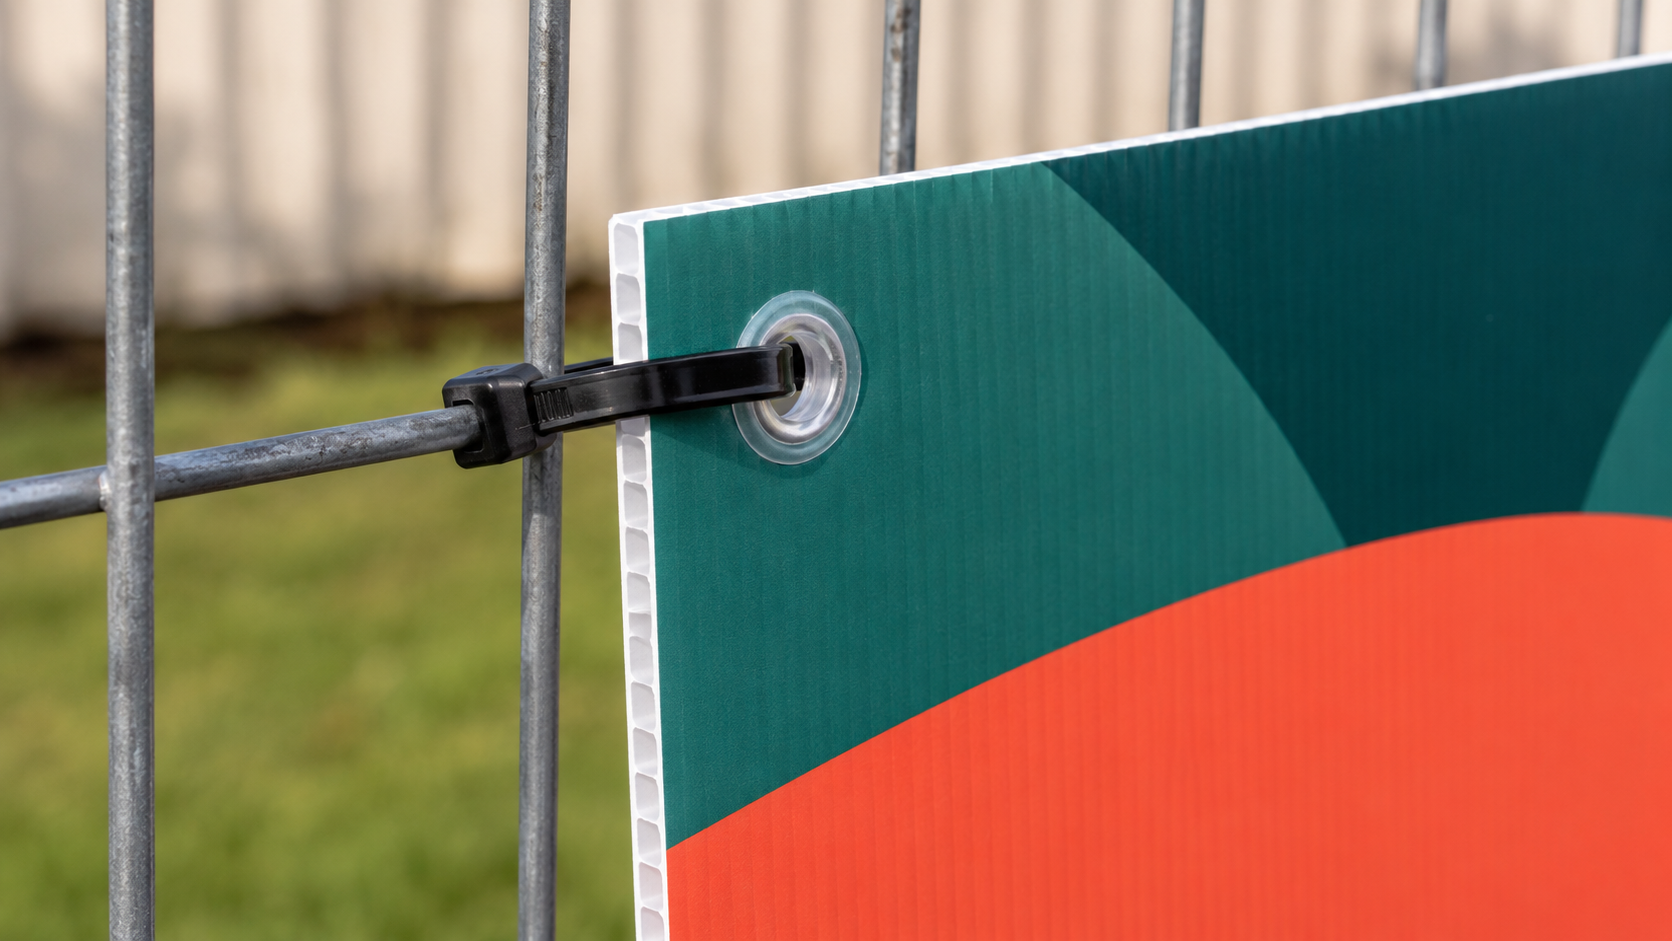
Holes in corflute signs are used for cable tie mounting, rope threading, screw mounting, and any fixing system that passes hardware through the sign rather than gripping its edges. Mediapoint cuts holes during production using CNC routing, not drilling, and the specifications matter for whether the holes survive in the field.
Minimum diameter
6mm. Smaller holes can't be reliably cut in corflute substrate. The router needs enough clearance to make a clean pass; below 6mm the cut tears the flute structure rather than removing material cleanly.
Cutting method
Router-cut, not drilled. This is a Mediapoint production fact worth understanding. CNC routing produces a clean, sealed hole that doesn't weaken the surrounding material. Drilling tends to crack the corflute at the hole edge as the drill bit pushes through, creating stress concentrations that fail under wind load. The difference matters most under sustained outdoor exposure where small defects propagate over weeks or months.
Edge clearance
Holes should clear the sign edge by at least 30mm. Holes too close to the edge tear out under wind load. Even a small wind gust can pull a 6mm hole positioned 10mm from the edge into a torn corner, and once the tear starts it propagates along the flute axis until the sign fails. The 30mm rule applies to all hole positions, not just corners.
Specifying holes in artwork
Indicate hole positions in the artwork file using a Thru-cut spot colour (covered in detail in the next section). The artwork shows where the holes go; Mediapoint cuts them at the production stage with the right tooling. Multi-hole signs are fine — common for fence-line installations needing four to six cable tie points. Each hole position gets marked with the Thru-cut spot colour.
Common mistake worth flagging: drilling holes through the printed sign in the field after delivery. This usually cracks the corflute at the hole edge and creates failure points where there shouldn't be any. Specify holes in the artwork before printing — Mediapoint cuts them properly with the right tooling, and the holes hold up under wind load the way drilled holes won't.
Custom shapes and Thru-cut
Thru-cut is Mediapoint's process for cutting corflute into custom outline shapes rather than rectangles. It's used for property-shaped real estate signs, custom event signs, retail point-of-sale shapes, and anything where a rectangular outline doesn't suit the design. The Thru-cut process produces clean cuts on simple shapes; the file setup is precise, and getting it right at the artwork stage saves a back-and-forth with prepress. The Thru-cut artwork requirements below are a summary — for the full file setup walkthrough covering Thru-cut, bleed, scale, colour, fonts and the broader export settings that catch designers out, see our corflute print file setup guide.
Artwork file requirements
The Thru-cut path in your file needs to follow specific rules:
Stroke name. Must be exactly 'Thru-cut', with that exact capitalisation and the hyphen. Variations like 'thrucut', 'Thru Cut', or 'Cut' won't be picked up by our production workflow.
Colour Type. Spot colour, not process. The CMYK values can be anything except white (do not use 0,0,0,0, or the path won't register as a cut).
Stroke alignment. Centre-aligned on the path, not inside or outside. This ensures the cutter follows the exact line you drew.
Closed shape. The Thru-cut path must be a fully closed shape. Open paths can't be cut.
Bleed outside the cut. Add 3mm bleed outside the Thru-cut stroke, the same way you would extend artwork past the trim on a rectangular job.
Outer cut required. If you have inner cuts (a window in the middle of the shape, for example), you still need the outer Thru-cut stroke that defines the overall sign outline.
One Thru-cut per file. Multiple separate cut paths on a single file aren't accepted. If you need different shapes, send them as separate files.
Shape complexity limits
Mediapoint's Thru-cut limit is convex shapes with up to 5 points. Simple shapes (rectangles with rounded corners, triangles, basic geometric forms, simple silhouettes like houses or speech bubbles) work well. Complex shapes (intricate logos, narrow protrusions, sharp internal corners) can't be reliably cut. The reason is structural: sharp internal corners crack corflute substrate at the cutting tool's pivot point, and narrow protrusions tear under handling stress before the sign even reaches installation.
Practical advice for designers: if your custom shape requires more than five points or has sharp inward angles, simplify the design. The Thru-cut process produces clean cuts on simple shapes; complex shapes either get rejected at prepress or fail during cutting. If you're unsure whether a shape will work, send the file across before the rest of the design is finalised. We can flag risk areas before you commit.
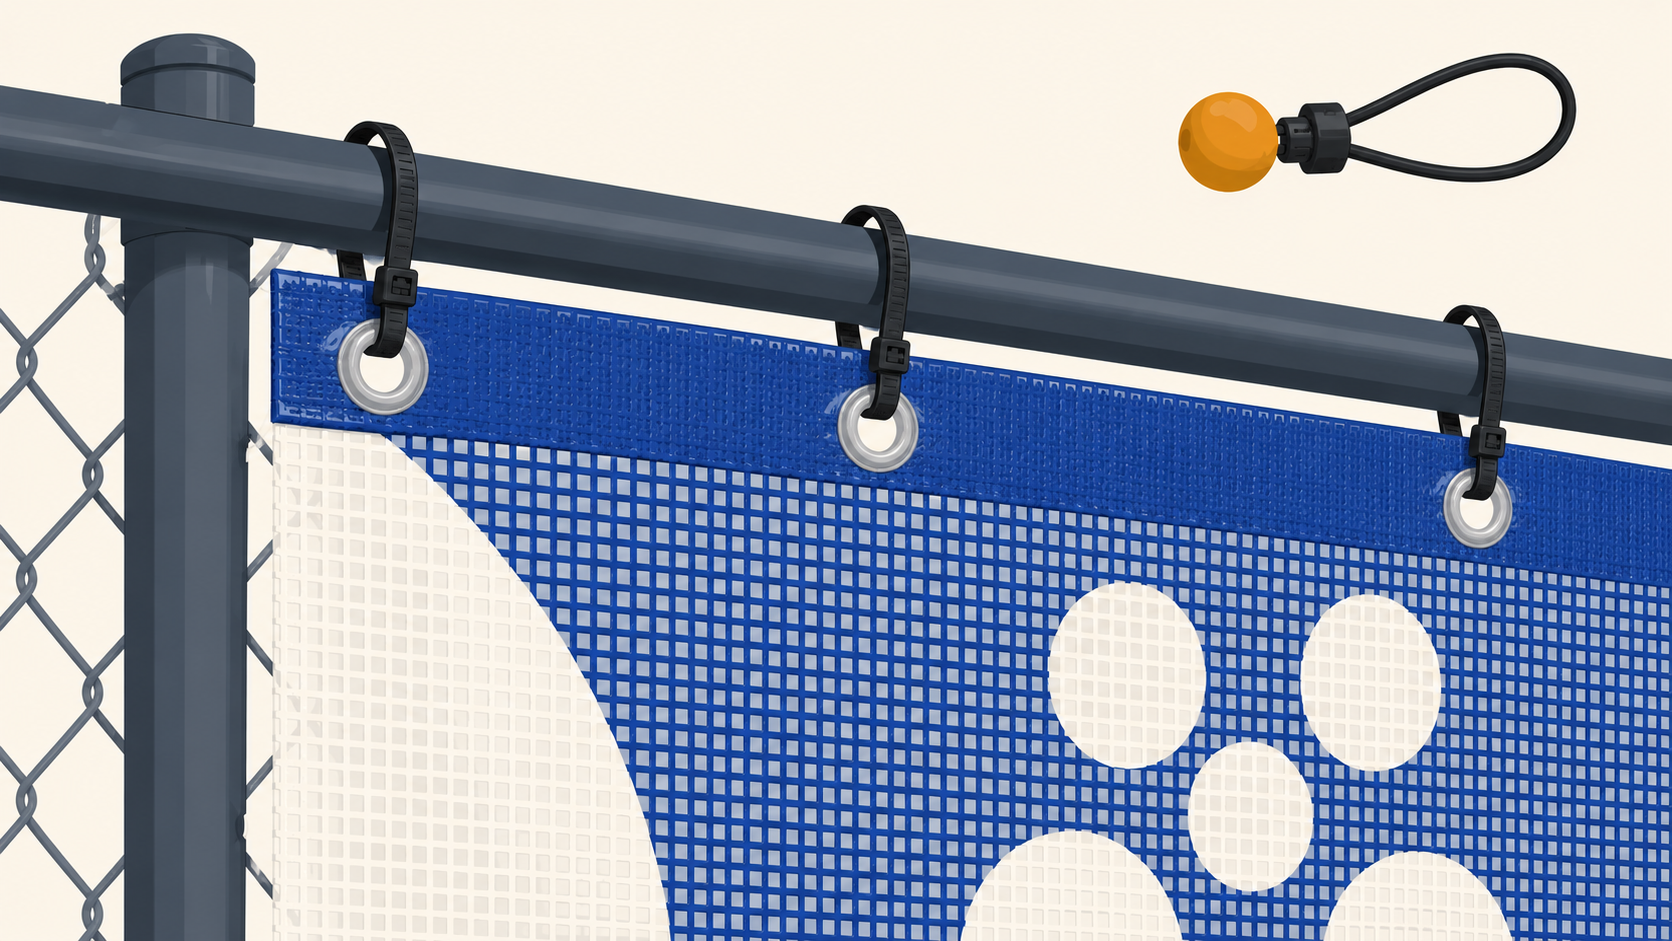
Eyelets
Eyelets are the metal rings pressed into the sign at corner or edge positions to provide a reinforced anchor point for rope, cable ties, or other cord-based mounting hardware. They're one of the most common finishing options on corflute signs and worth getting right at order time.
How eyelets are added
Eyelets are a finishing service added after printing, not part of the artwork file. You don't draw them in your artwork or mark their positions in the file. Specify eyelets at order time as a finishing option, including the quantity and position you need.
Standard placement
One eyelet in each corner for typical 600 × 900mm signs. For larger formats (900 × 1200mm or full-sheet 1200 × 2400mm hoarding panels) or wind-exposed installations, additional mid-edge eyelets distribute mounting load and prevent the sign sagging or tearing along the unsupported span between corners. The brief should specify the count and position; we'll add them at the right places.
Edge clearance
Standard practice is at least 30mm from the sign edge. Eyelets too close to the edge fail under wind load — same principle as hole cutting. The metal ring distributes load across the eyelet, but if there isn't enough corflute around the eyelet to anchor it, the failure mode is the eyelet tearing through the substrate rather than the rope tearing the eyelet.
Why eyelets matter
Rope mounting, cable tie mounting, and any rope or cord-based fixing relies on eyelets to distribute load. Without eyelets, mounting hardware tears through the corflute substrate quickly — a cable tie threaded directly through the substrate without an eyelet typically lasts a few weeks before the substrate gives way. Eyelets cost a small amount per sign and dramatically extend the life of the mounting.
Eyelet sizes
Standard sizes are available; confirm specific options at order time. Larger eyelet diameters distribute load better but add cost. For most jobs the standard size is fine; specify a larger size only when the application calls for it (heavy-duty mounting, large hoarding panels, or installations where mounting failure would be especially costly to remediate).
Stake mounting
Stake mounting is the dominant method for election picket signs, lawn-mounted real estate signs, and any installation where the sign needs to be ground-mounted in soft substrate. Most stake-mounting failures are preventable with the right materials and technique.
Stake types
Metal U-stakes (the C-shaped ones used by election volunteers) are the workhorse for a reason. Stronger than wedge stakes, more resilient than wooden stakes (which split when hammered into hard ground), and dramatically stronger than plastic stakes (which flex and fail easily). For any installation you actually want to survive, metal U-stakes are the default.
Stake length
Longer stakes hold better. Minimum 30cm into the ground for soft soil. 45cm or more for sandy or loose soil. Lawn installations are particularly weak because the soil is loose at the surface and dense underneath; drive deep, because the first 10cm of lawn does almost nothing for holding strength.
Soil type
Clay holds best. Sand holds worst. Lawn sits in between. Coastal sand is the worst combination available: loose substrate plus high wind exposure. If you're installing into coastal sand, plan for failure regardless of mounting practice, or move to a different installation approach (frame mounting in a sheltered position, for example).
The two-stake technique
For any 600 × 900mm sign in a roadside or exposed location, use two stakes (one each side of the sign) with the sign sandwiched between them or attached via cable ties through the eyelets. This roughly doubles wind resistance for less than 50% extra installation cost. There is no other single change to standard installation practice that gives a comparable resistance gain.
For wind-resistance considerations and full stake mounting detail, see our wind damage guide.
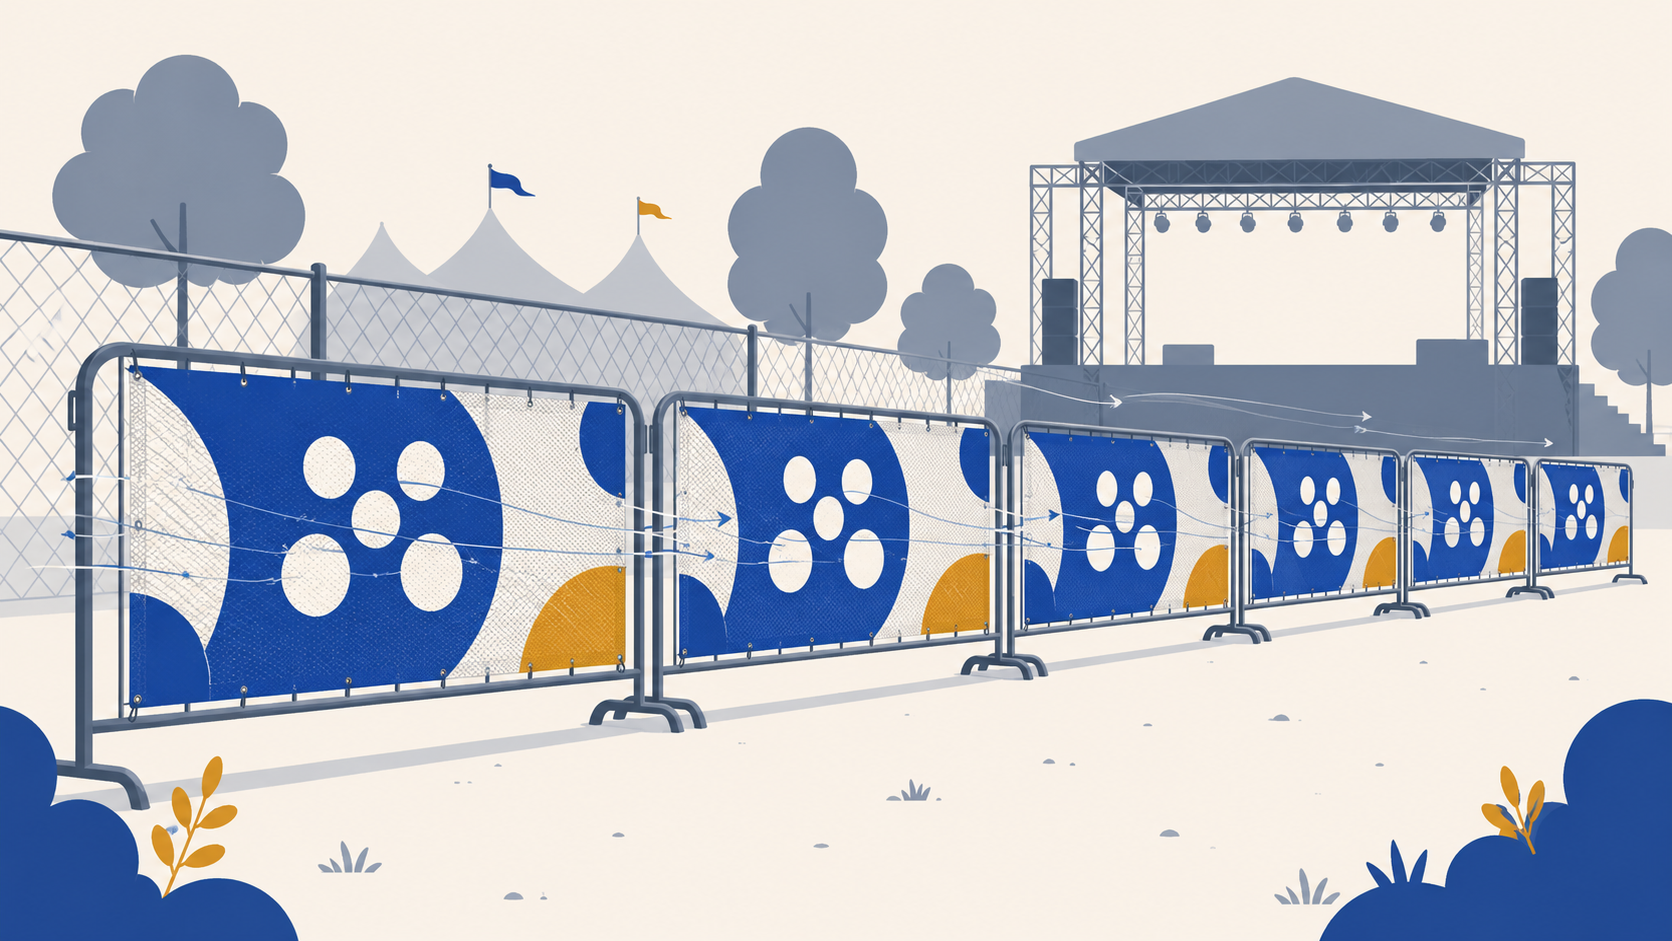
Cable tie mounting on fencing
Cable tie mounting on temporary fencing is the dominant method for construction signage and any fence-line installation. Get it right and signs survive months of exposure. Get it wrong and replacement becomes a recurring cost.
Cable tie quantity
Four ties per 600 × 900mm sign minimum, one in each corner threaded through the eyelets and around the fence wire. For larger formats or wind-exposed installations, add additional ties along the edges between the corners. For 1200 × 2400mm hoarding panels, eight to twelve ties spaced along the edges, with closer spacing on the windward side if site exposure is asymmetric.
UV-stable cable ties only
Standard nylon cable ties degrade under sun exposure and can fail at six to twelve months on outdoor sites, often before the sign itself shows fade. UV-stable ties (often labelled UV-resistant or weather-resistant) cost marginally more and last the substrate's full lifespan. Specify them at order time, not as an upgrade after the first batch fails. The cost difference is small; the failure cost is large.
Tightness
Snug, not over-tensioned. Over-tightened ties can shred eyelet holes under wind movement, and the failure mode is usually the eyelet tearing through rather than the tie itself breaking. The sign should be held firmly to the fence with no slack, but no compression. Two-fingertip pressure on the tie is about right; if the sign can't move at all relative to the fence, the ties are too tight.
Replacement frequency
Inspect cable ties at quarterly site signage inspections. Replace any UV-degraded or stretched ties before they fail. A loose sign on temporary fencing in a wind event becomes a safety risk to passers-by and a council compliance problem; both are cheaper to prevent than to fix.
Frame mounting
Frame mounting is the most stable mounting method for the same surface area. The frame transfers wind load to ground or wall structure rather than into the sign itself, which is why frame-mounted signs survive wind that would defeat stake or cable-tie mountings of the same size.
Real estate agency frames
Australian real estate frames are typically built around the 600 × 900mm corflute size. Mediapoint signs at this standard size fit most agency frames without adjustment. The frame holds the corflute by its top and bottom edges, with the sign sliding into channel slots that grip the substrate without needing additional fixings. This is part of why 600 × 900mm became the real estate standard — the hardware ecosystem is built around it, and specifying anything else means custom hardware. Frame specifications do vary by manufacturer, so for clients using non-standard or custom frames it's worth confirming dimensions before locking artwork.
A-frame inserts
The 600 × 450mm corflute size is the dominant A-frame insert format in Australia. The corflute slides into the frame opening on both faces. Most A-frames are designed for double-sided print on Corrugated Plastic so the message reads to foot traffic from both directions, though some accept single-sided Corflute Print Only for one-direction installations.
Strengths
Most stable mounting type for the same surface area. Transfers wind load to the frame structure rather than the sign itself. Protects sign edges from handling damage — the corflute sits inside the frame channel rather than being exposed to knocks and tears at the edges. Looks more professional than stake or cable-tie mounting.
Weaknesses
Requires the right hardware. Frames cost money. Sign size must match the frame opening, so custom sizes don't work in standard frames. For applications outside the standard size and frame ecosystem, custom frame fabrication is possible but adds significant cost.
Adhesive mounting
Adhesive mounting works for short-term sheltered indoor display only. Wall-mounted shop signs, temporary indoor directional signs, point-of-sale display in protected positions. For these applications, adhesive is fine.
It does not work outdoors. Wind exposure rapidly defeats adhesive — signs lift at corners and progressively detach until the whole sign comes off. UV degrades adhesive bonds over time, particularly on transparent or weak adhesives. Temperature variation between Australian summer and winter breaks adhesive bonds even on sheltered installations, because the substrate and the wall it's adhered to expand and contract at different rates.
Better alternatives for permanent wall mounting: screw mounting through corner eyelets (with standoffs for hollow walls). For temporary installations needing easy removal: magnetic mounting (works on metal substrates) or velcro tape (limited use but reusable). Reserve adhesive for genuinely temporary indoor display, applications inside vehicles or shop windows where the adhesive is sheltered, or signs that will be discarded with the adhesive at end of use.
Wall mounting and other fixings
For non-standard mounting situations that don't fit the categories above.
Screw mounting
Through corner eyelets directly into the wall structure. For hollow walls (plasterboard), use standoffs to prevent the sign pulling through the wall surface under wind load — the standoff distributes load across a larger area of the wall. For masonry, standard masonry plugs and screws work fine. The eyelet protects the corflute from the screw thread, which would otherwise cut the substrate as the sign moves.
Magnetic mounting
Works on metal substrates: refrigerators, metal panels, vehicle bodies, steel hoarding. Magnetic backing is added separately, either as magnetic strips applied to the back of the corflute or as magnetic mounting hardware that grips the sign. Useful for installations where the sign needs to come on and off frequently without leaving fixing holes.
Hanging signs
Rope or chain through eyelets at the top corners. For double-sided signs (Corrugated Plastic), the artwork should be designed to read correctly on both faces when hung, with the orientation considered at the design stage rather than after the sign is delivered.
Display stands and easels
For indoor display, signs can sit in standard easel-style display stands without permanent mounting hardware. Useful for trade show signage, retail point-of-sale, conference and event collateral that needs to be positioned and repositioned across a venue.
Common mounting failures and how to prevent them
Most mounting failures are preventable with the right specification at the artwork stage or the right material at installation. The failures below account for the majority of preventable corflute sign losses.
Holes too close to the edge
The most common preventable failure. Maintain at least 30mm edge clearance for any hole or eyelet position. Holes positioned 10 or 15mm from the edge tear out under the first significant wind load and the failure propagates along the flute axis until the corner tears off entirely.
Drilled holes instead of router-cut
Drilling cracks corflute at the hole edge. If holes weren't specified in the original artwork and you need them after delivery, get them cut properly rather than drilling in the field. The cost of recutting is much smaller than the cost of replacing signs that have failed at drilled hole sites.
Standard nylon cable ties on outdoor signs
Degrade in six to twelve months under sun exposure, fail under wind load. Use UV-stable ties only. The cost difference is marginal; the failure cost is significant.
Single-stake mounting on exposed sites
Signs pivot around the stake under wind load and lift away from the stake. Use the two-stake technique on any roadside or wind-exposed installation.
Over-tightened mounting
Rope or cable ties pulled too tight create stress points that propagate failure. The substrate gets crushed at the eyelet position, the eyelet weakens, and the next significant wind load tears the eyelet out. Snug, not crushed.
Adhesive mounting outdoors
Wind, UV and temperature variation will defeat adhesive within months. Use mechanical fixings (screws, cable ties, frames, stakes) for any outdoor work.
Sharp internal corners on Thru-cut shapes
Crack the substrate at the cutting tool's pivot point. Stick to convex shapes with up to five points. If your design needs more complexity than that, simplify the design or split it into multiple simpler shapes.
Frequently asked questions
Can I drill my own holes in corflute signs after delivery?
Possible but not recommended. Drilling tends to crack corflute at the hole edge, creating failure points. Specify holes in the artwork before printing — Mediapoint cuts them properly with router tooling. If you need additional holes after delivery, ask us to recut rather than drilling in the field.
What's the smallest hole Mediapoint can cut in corflute?
6mm diameter. Smaller holes can't be reliably cut in the substrate — the router needs enough clearance to make a clean pass, and below 6mm the cut tears the flute structure rather than removing material cleanly.
Do eyelets cost extra?
Yes. Eyelets are a finishing service added after printing, priced per eyelet or per sign depending on quantity and configuration. Specify eyelets at order time for accurate pricing rather than as an afterthought, because adding them post-print is more expensive than adding them in the same production run.
Can I get a custom-shaped corflute sign with intricate detail?
Mediapoint's Thru-cut limit is convex shapes with up to 5 points. Intricate logos or shapes with narrow protrusions can't be reliably cut. For simpler custom shapes (rounded corners, basic silhouettes, geometric forms) Thru-cut works well. If your design is more complex than that, simplify it before submitting the artwork.
What's the right cable tie for fence-mounted signs?
UV-stable cable ties, often labelled UV-resistant or weather-resistant. Standard nylon cable ties degrade in sun exposure within six to twelve months and can fail under wind load. The cost difference is small; the failure cost is much larger.
Can corflute signs be mounted with screws?
Yes, through corner eyelets. For hollow walls (plasterboard), use standoffs to prevent the sign pulling through the wall surface under wind load. For masonry, standard masonry plugs and screws work. Don't screw directly through the corflute substrate without an eyelet — the screw thread cuts the substrate over time as the sign moves.
Key takeaways
The points worth remembering when specifying or installing corflute signs.
Holes: 6mm minimum, router-cut (not drilled), 30mm edge clearance from any hole to the sign edge.
Thru-cut custom shapes: spot colour named exactly 'Thru-cut', centre-aligned stroke, closed shape, one Thru-cut per file. Convex shapes with up to 5 points only.
Eyelets: finishing service added after printing, 30mm from edge minimum. Specify at order time, not after.
Stakes: two-stake technique for any wind-exposed installation. UV-stable materials for outdoor longevity.
Cable ties: UV-stable only. Standard nylon fails in 6 to 12 months outdoors.
Frames: 600 × 900mm corflute fits standard real estate frames. 600 × 450mm is the standard A-frame insert size.
Adhesive: short-term sheltered indoor only. Wind, UV and temperature variation defeat adhesive outdoors.
Most mounting failures are preventable with the right specification at the artwork stage. The cheapest fix is the one made before the file is exported.
Working with Mediapoint on mounted corflute
Mediapoint prints corflute with router-cut holes and Thru-cut custom shapes per the specifications above. Eyelet finishing is available on order — specify at order time so the finishing is included in the production schedule and pricing. Standard turnaround starts from the next business day for files received and approved before the daily cut-off. For multi-design orders or large mounting hardware specifications across a project, get in touch directly to coordinate production.
View our Corflute Print Only product for single-sided signage with the full range of mounting and finishing options. For corflute information across the cluster (sizes, applications, file setup, durability, wind, comparison with other substrates), the rest of the corflute series is the place to start.
A final note on installation responsibility: the mounting guidance in this article is general reference based on Mediapoint's product specifications and general industry practice. Specific installation outcomes depend on site conditions, hardware quality, weather events and installation technique — factors outside Mediapoint's control. For high-stakes installations where mounting failure has significant consequences, consult a qualified sign installer about site-specific requirements. The customer or installer is responsible for installation decisions and outcomes.